If you want to make more complex animations that involve things that float or bounce in the air, then using a rig will become necessary.
Surprisingly, stop motion rigs are pretty difficult to come by. Even the few options you see on Amazon and eBay are pretty limited.
We guess that it's mostly because there isn't a lot of regular-consumer demand for stop motion rigging. After all, veteran animators build their rigs, and animation studios even have rigging departments where they create customized parts necessary for different shots.
But how about us, regular social media animators? Where can we get stop motion rigs for our projects?
There are a few options, such as Kinetic Armatures and Animation Toolkit. You can even buy kits from Cinespark through Amazon. Of course, there's also the occasional custom options on Etsy and eBay. But some kits can be expensive, and the delivery can sometimes take weeks for some kits.
So what if you have an upcoming project that needs a stop motion rig and can't wait weeks for a professional kit? Don't worry, because we have the perfect solution...
Enter the helping hands!
The remarkable tool you see below is literally called 'helping hands.' It may have a funny name that can confuse people, but this is all you need for making a DIY stop motion rig.

The helping hands are mainly used by watchmakers, craft-makers, and electronics enthusiasts. It has metal arms with alligator clips to secure small things such as electronic parts or watches. That way, the user doesn't have to worry about the item moving while doing some soldering and tinkering.
If you're an animator, you can use the metal arms and those alligator clips to secure an item you want to animate!
So how do you turn a pair of helping hands into a DIY stop motion rig?
Everything you need to make a DIY stop motion rig is already present in your helping hands. All you need is to reconfigure it to suit your requirements.

Helping hands have wing nuts that let you adjust the arm and the alligator clips with just your fingers. As you can see, it's similar to the adjustable joints present in professional stop motion rigs.

When animating, you'll only need one alligator clip. So loosen the wing nut of one of the alligator clips to remove it.
Next, loosen the attachment at the base of the helping hands that supports the arm. It's pretty tight, so you may have to use a pair of pliers to unscrew it.

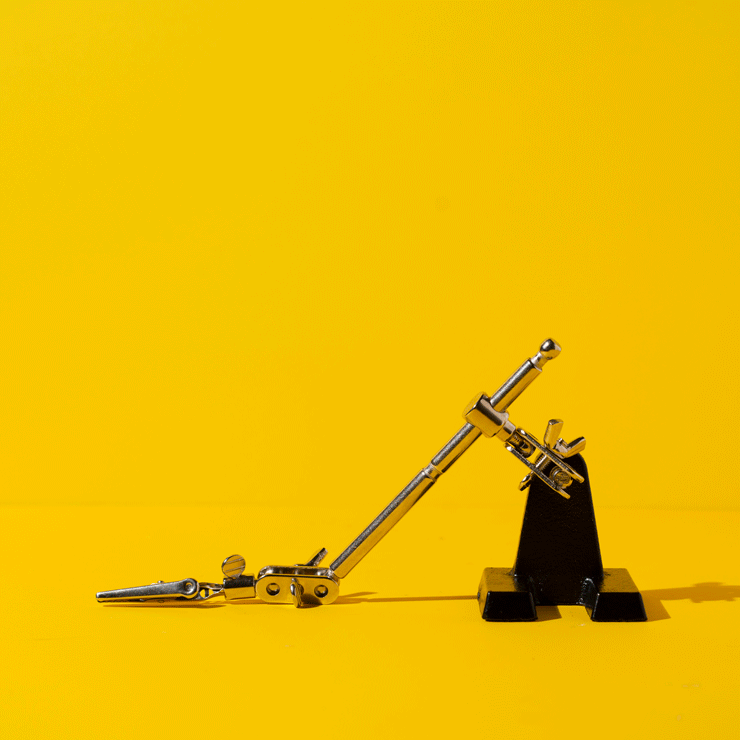
Once you finish loosening the middle attachment, move the arm to one side of the helping hands so it looks like the photo you see below:

After you adjust the arm, you're ready to start working on your animation! To show you how the DIY rig works, here's a short clip of it in use:

Remember that you don't have to loosen and tighten the wing nuts every time you adjust it. Loosen it just enough so you can twist it around without it falling off easily.
Need a longer DIY stop motion rig? Here's what you need to do:
Get another set of helping hands and remove the entire arm from the base.
Use the wing nut joints to connect one arm to another. Once you link both arms, you can attach an alligator clip at the tip.

If you did everything correctly, you should have something similar to the rig you see below:

Since the arms are longer, your rig's center of balance may be a bit off. So feel free to attach it to a metal plate or something similar to make it heavier and more stable.
Here's the long rig in action while making one of our early animations. We attached it to the table using another helping hand base and also taped it to the table for extra security.

Note: We didn't even have Dragonframe at this point. We connected our camera to a computer monitor to create animations and triggered the shutter with a remote.
Professional rigs would be helpful once you start getting bigger projects that demand precise movements and can carry heavier products. But if you don't find yourself making objects float in the air all the time, the DIY rig is all you'll need.
Despite being DIY, rigs made from helping hands also work surprisingly like professional rigs. So feel free to use them for practice as well. Once you get used to working with DIY rigs, dealing with professional options will be a breeze!
And since you made it this far...
We're happy to announce yet another GIVEAWAY! This time, we will be sending one LUCKY MEMBER this beautiful professional stop motion rig you see below!

All you have to do is leave your Instagram handle in the comment section, and at the end of the month, we'll choose one lucky winner via randomizer!
P.S. One of our goals for this blog is to build a thriving community of stop motion animators. So as you leave your Instagram handle in the comment section, feel free to follow fellow members as well!