Aside from claymation, papercraft animation has become quite a popular subgenre of stop motion in the past few years, primarily due to its whimsical aesthetic. The unique textures and colors it brings to the screen remind people that they're watching something made out of real, palpable materials.

So how exactly do you create papercraft items for animation? We'll show you how to do it both by hand and using machines!
So what's the difference between cutouts and papercraft?
You can think of cutout animation as the moving version of a collage. Animators who work with cutouts use found photos from magazines and other printed publications, cut them up, and create something original with them.
Meanwhile, papercraft animation involves building objects out of paper or cardboard. Animators who work with papercraft cut out shapes from colored paper or cardboard to create different types of props.
Basic papercraft is relatively easy to do. After all, anyone can cut a cat's silhouette or a leaf. However, if you want to create elaborate 3-dimensional papercraft props, keep in mind that it will take a lot of time and patience. So we suggest you start on a level where you feel more comfortable.
How do you create papercraft props?
There are two common ways to create papercraft objects. You can either do it by hand or use a machine (particularly the Cricut) to cut out the paper/cardboard pieces.
We'll show you the general steps necessary for building props, either manually or by mechanical means (i.e., Cricut).
Step 1: Draw/Create a design.
If you're great at drawing on paper or cardboard, feel free to sketch designs by hand.
However, remember that you may need multiple copies of your drawings, especially if you're working with several colors. So we suggest scanning your sketches and printing them out on a color cardboard.
If you're familiar with graphic design and use Adobe Illustrator, feel free to use that instead. It has all the tools you need to fast-track the process of creating papercraft.
Alternatively, you can look for vector art on popular stock sites like we did for this project. All the elements you see in the animation were taken from Canva.
The key here is to ensure you have a digital copy of your design. That way, you'll find it easy to replicate it and print it as often as you need.
Step 2: Add colors to your drawings.
Adding colors to a papercraft graphic is much like silkscreen printing. You'll need a separate silkscreen for every color you want to add.
If you want to create a design in either Photoshop or Illustrator, we suggest adding colors via layers just like you would with silkscreen printing.
Whether you're using Photoshop or Illustrator, you'll find the Create New Layer icon at the bottom right of the Layers Panel.
Now let's figure out how to use Layers in Adobe Illustrator:
First, draw the outlines or the general shape of the object you want to create.
If you need to add a color shape, click Create New Layer and start drawing. You can then use the Live Paint Bucket tool to fill the shape with the color you want.

Export your file as SVG to make sure those layers stay intact. That way, you can easily print all these layers separately or open them in the Cricut app.
What if you want to draw your design by hand?
You can easily do so on paper. But you will still have to scan your design and apply the color layers in either Photoshop or Illustrator.
And what if you don't know how to draw at all?
There are tons of SVG vector art available on stock websites such as Shutterstock and Adobe Stock. When you open these files in Illustrator, you can see the separate layers and thus be able to print them out individually or open them in the Cricut app.

We used Canva for our vector art. But beware that this app doesn't export vector assets as SVG files. Thankfully, the designs we used were simple, and all we had to do was download the images as PNG files with transparent backgrounds.
Step 3: Print and cut your designs
Just like drawing objects and adding color, there are two main methods for printing and cutting your designs: By hand or with Cricut. We'll show you the process for each one below.
By hand
First, you'll need to print each layer in the color cardstock you want using a regular inkjet printer. Make sure you only use greyscale, as it's pointless to waste color ink for this project.

After printing, use an X-acto knife to cut out the shapes you created. Let the printed outlines on the cardstock guide you where you're supposed to go. Be as precise as possible, so your cutouts look clean.

Finally, flip the cards you cut out so you don't see the printed side when you glue the cards together.

With Cricut
Cricut has a dedicated app called Cricut Design Space that allows you to upload, edit, and cut designs. We'll show you the basics of using this program and the Cricut machine.
Once you download Cricut Design Space, please open it and select New Project.
When the blank canvas opens, select Upload > Upload Image. You can then drag and drop the file you want to cut into the app.

After the image finishes loading, the app will ask you to choose the Image Type. Depending on the complexity of your design, you can select between Simple, Moderately Complex, and Complex.

Next, Cricut Design Space will ask you to Select Upload Type. You can choose between Cut Image and Print, then Cut Image. The first option means you'll need to print the design from a regular printer first, then feed it into your Cricut device to cut the shape. For our purposes, we only needed to cut our pattern, so we selected Cut Image.

Once the file appears in the Recent Uploads gallery, please select it and click Add to Canvas.

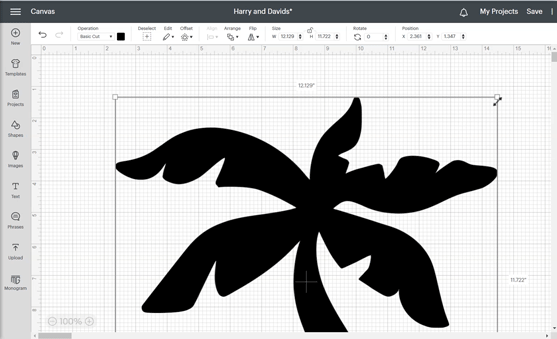
Drag the points in the corners of the object to resize your file. And if you want to duplicate the pattern, press CTRL + C and then CTRL + V to start replicating your design. Just make sure your prints don't exceed the size of the paper or cardboard you want to use for printing (it's typically 12x12 or 12x24).
After making changes to your file, click the Make It tab. Cricut will then prompt you to prepare the mat that comes with the device.

At this point, you'll need to place the cardboard on Cricut's cutting mat. The mat has a sticky surface, so the cardboard sticks nicely to it. Make sure the edge of the board aligns with the lines on the mat to ensure precise cutting.

Load the mat into the Cricut tray and press Continue.

Now you'll need to connect your Cricut to your computer. Once the app confirms the connection, follow the prompts it gives you.
Switch the material selector knob to choose the material you want to cut. In our case, it's either Light Cardstock or Cardstock.

First, it will ask you to press the Up/Down arrow button. When you do, push the mat gently into the tray until the Up/Down arrow button stops blinking.

Next, press the button with the Cricut icon to start printing!
After Cricut finishes cutting your designs, take the mat out of the tray and carefully peel them off with the spatula and tweezers. After separating your patterns from the mat, you can start gluing them together, and you're ready to animate!

Step 4: Pasting the parts together.
Once you finish cutting all the color parts, it's time to glue them together. As you can see below, to create the pink and white striped beach towel, all we had to do was to paste pink strips onto white pieces of cardboard.

If you need your papercraft object to be erect (like our palm trees), you can create a little stand using a spare piece of cardboard like you see below.

Step 4: Start animating.
Creating a papercraft animation is the same as any regular stop motion. But what makes it challenging is that cardboard is quite stiff.
One way to get around that is to avoid gluing the moving parts to the rest of any papercraft object.
Let's use the waves below as an example. We very well could have glued all the three waves together. But then again, it would look quite stiff. That's why we decided to keep the waves separate so that we could move them individually.

You can do the same technique on about anything, from waving hands to walking character. As long as you don't attach/glue the moving parts to the non-moving parts, you shouldn't have any problem animating.
However, keep in mind that since the cardboard pieces are resting on top of each other, you need to be careful not to hit the elements you want to stay still. So feel free to use a pair of tweezers to help you nudge only the parts you want to move.

Another option is to use replacement animation. Instead of moving loose parts, you can print and glue together the entire papercraft object for one frame, then create another for the next frame. It's pretty tedious, but it will give you the best results because you don't have to deal with loose cardboard pieces.
For the most part, cutting out papercraft patterns is the same whether you're doing it by hand or with Cricut. The only difference is that using a machine allows you to speed up the process and get more precise results.
No matter which method you end up trying, the result you get will also still be the same. So you should play with this type of animation even if you don't have a Cricut!