When we started making stop motion, we avoided the green screen like the plague. For us, it just seemed too technical to use, and the results often looked fake.

But as our projects became more ambitious, we realized that the traditional way of creating stop motion animation limited what we thought we could accomplish.
So one day, we bought a green screen to experiment with it. And as soon as we figured out how to use it properly, we were pleasantly surprised with the outcome.

We don't want you to go through all the frustrations of misusing the green screen. So, we'll answer some questions to help you achieve realistic results with a green screen right off the bat.
Why use a green screen?
The technical term for green screen is Chroma Key. It's a method that involves using a colored background to create a composite of multiple images or video clips.
As you can see in the sample GIF below, a green screen is the most efficient way to combine two (or more) visuals.

Now you must be asking: Why not just use a real background in the first place?
The simple answer is that there are times when it's impossible or impractical to use a real background.
Let's use our sample video as an example. Although we created the spinning doughnuts using stop motion, we recorded the tapping fingers live.

In typical situations, it would be impossible to record live movement at the same time you're creating stop motion. But since we're using a green screen, we were able to combine these disparate shots seamlessly into one!
What type of background do you need for green screen?
You must be wondering why we call it a green screen when we used blue for this project. \
Technically, you can select any color for chroma key. But filmmakers prefer bright blue or green because you rarely see these colors used regularly in the real world. Consequently, there's a significantly lesser chance for your main subject (people or products) to blend with the background.
In our studio, we like using blue. But keep in mind that selecting a color is more than a preference. It also has a few practical purposes.
For instance, if you make Jonah Hill dress up in a green long-sleeved shirt in front of a green screen, you know what would happen? That's right! His body would disappear, as you can see in the clip below.
Meanwhile, Cecily Strong's blue dress isn't "invisible" because the background is green. But if the television crew used a blue screen, it would be Cecily Strong's dress that would disappear, not Jonah Hill's shirt.
When chroma keying, all you need is any surface with a bright green or blue hue in most cases. That means you could use anything from paper to cardboard that's close to this shade of green:

Or this shade of Blue:

When chroma keying small objects, we often use either green paper or cardboard.
But for shoots that require a bigger green or blue surface, we use a collapsible 5 x 6.6 ft. green screen you see below.

If we end up requiring an even larger surface area in the future, then an 8.5 x 10ft. seamless green screen may be necessary. But since our projects so far only involve small products, the six ft. screen is more than enough.
Of course, let's not forget that some studios that film multiple people or giant sets (such as in movies) even use green or blue cycloramas that cover a large area of the shooting space.
How do you illuminate a green screen?
A crucial part of shooting on a green screen is to make sure it's evenly lit.

You see, the hue of any surface (including the green screen) changes slightly depending on the light shining on it.
If there are areas on your green screen that aren't adequately lit, you'll end up with patches of dark green instead of the ideal bright green.
Consequently, those dark patches of green may be difficult (or even impossible) to remove in post-production.
So what's the solution? When lighting your set, make sure there are no shadows on the green screen.

If you end up with shadows, pull back your green screen at least eight feet away from your set. You can then place two or more lights in front of the screen to illuminate it evenly.
You should also be aware of any color cast that may reflect on your product. Otherwise, your main subject might end up with missing edges because it's starting to blend with the background.
If color cast occurs, move your green screen further back because that means it's reflecting light onto your product. You can also readjust your background lights, so they're not too bright.
How Do you Find The Best Background?
So do you want to create a realistic composite for your stop motion animation? Here are a few crucial tips you need to remember:

Make sure the lighting you use on your set matches the background you choose. In other words, if you use soft window lighting on the product you're shooting, you have to select a backdrop that also has soft window lighting.
Make sure the direction of the light and shadows both in your set and your background match. People will notice it right away if your product has shadows on the left side and your background has shadows on the right side.
Make sure the background you select has the same angle as the set you're shooting. In other words, you can't choose a background shot from a 45-degree angle if you plan to record your animation from eye-level (straight on).
Choose your background before shooting so you'll have a better idea of how to light and shoot your set. It's better to adjust the light while you're shooting than scouring through thousands of stock photos that match your shot's lighting. Alternatively, you can shoot the background yourself like we did! That way, you can guarantee everything matches.
How do you shoot with a green screen?
Once you finish setting up and lighting your green screen, all you have to do at this point is start shooting like normal.

Just make sure you don't change the angle of your shot. Your camera's perspective needs to be consistent with the angle of your background.
If you're using Dragonframe, you can use its background preview option so you can better see how your final product would look like.
1. Click the Animation icon and select the Guide Layers tab.
2. Look for Media Layers, click the + icon, and choose Load Movie or Load Image depending on which background type you'd like to use. Once your selected background image or video loads, you'll see it in the timeline under the Live View screen as thumbnails.
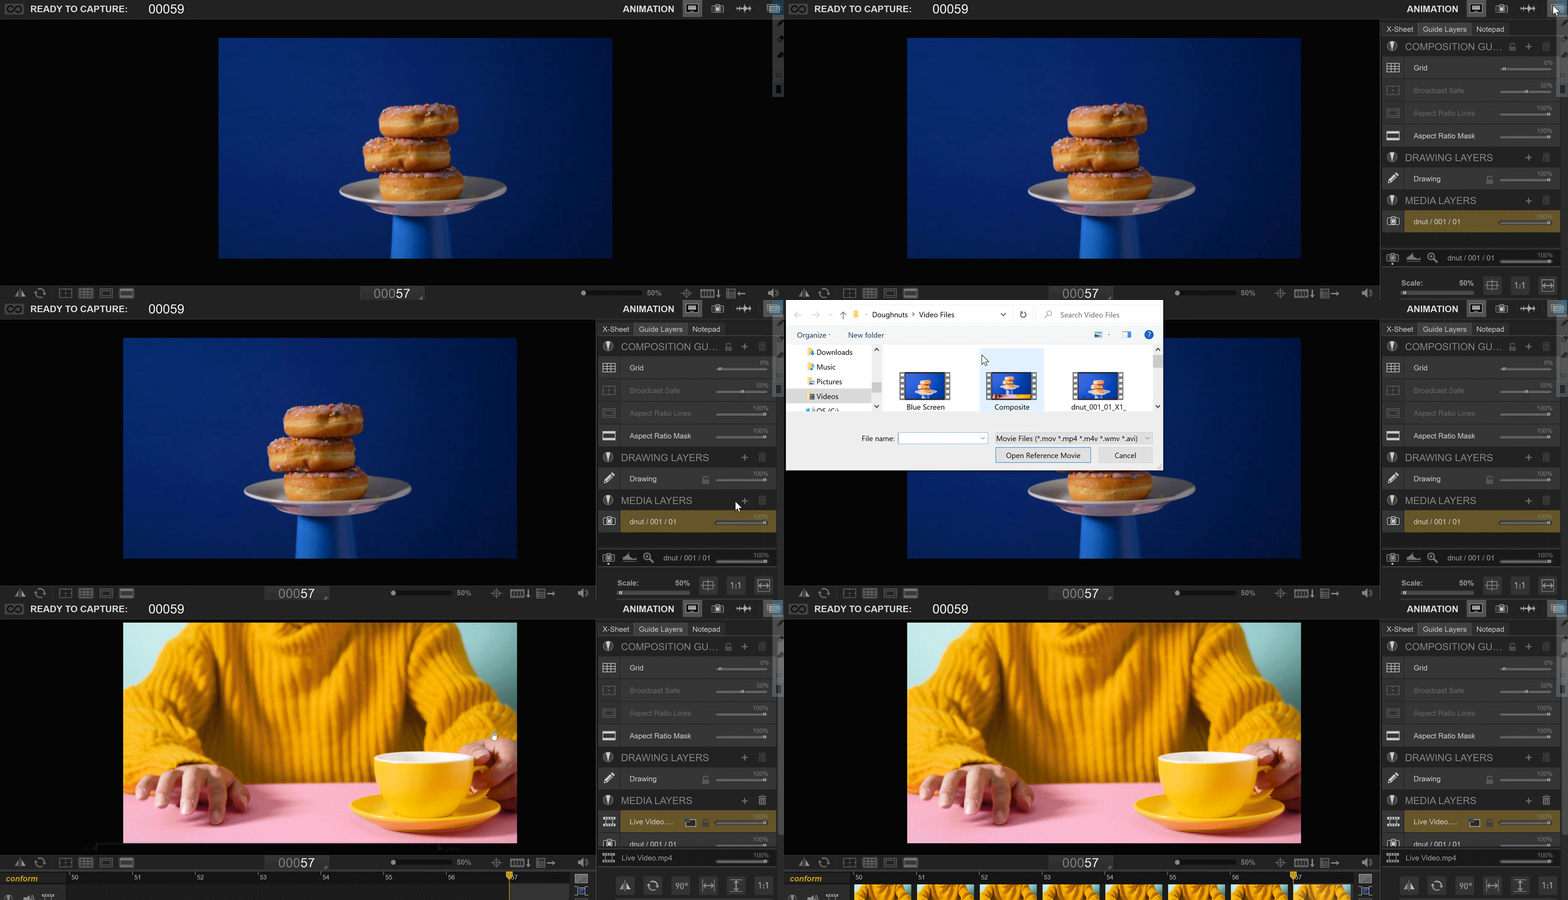
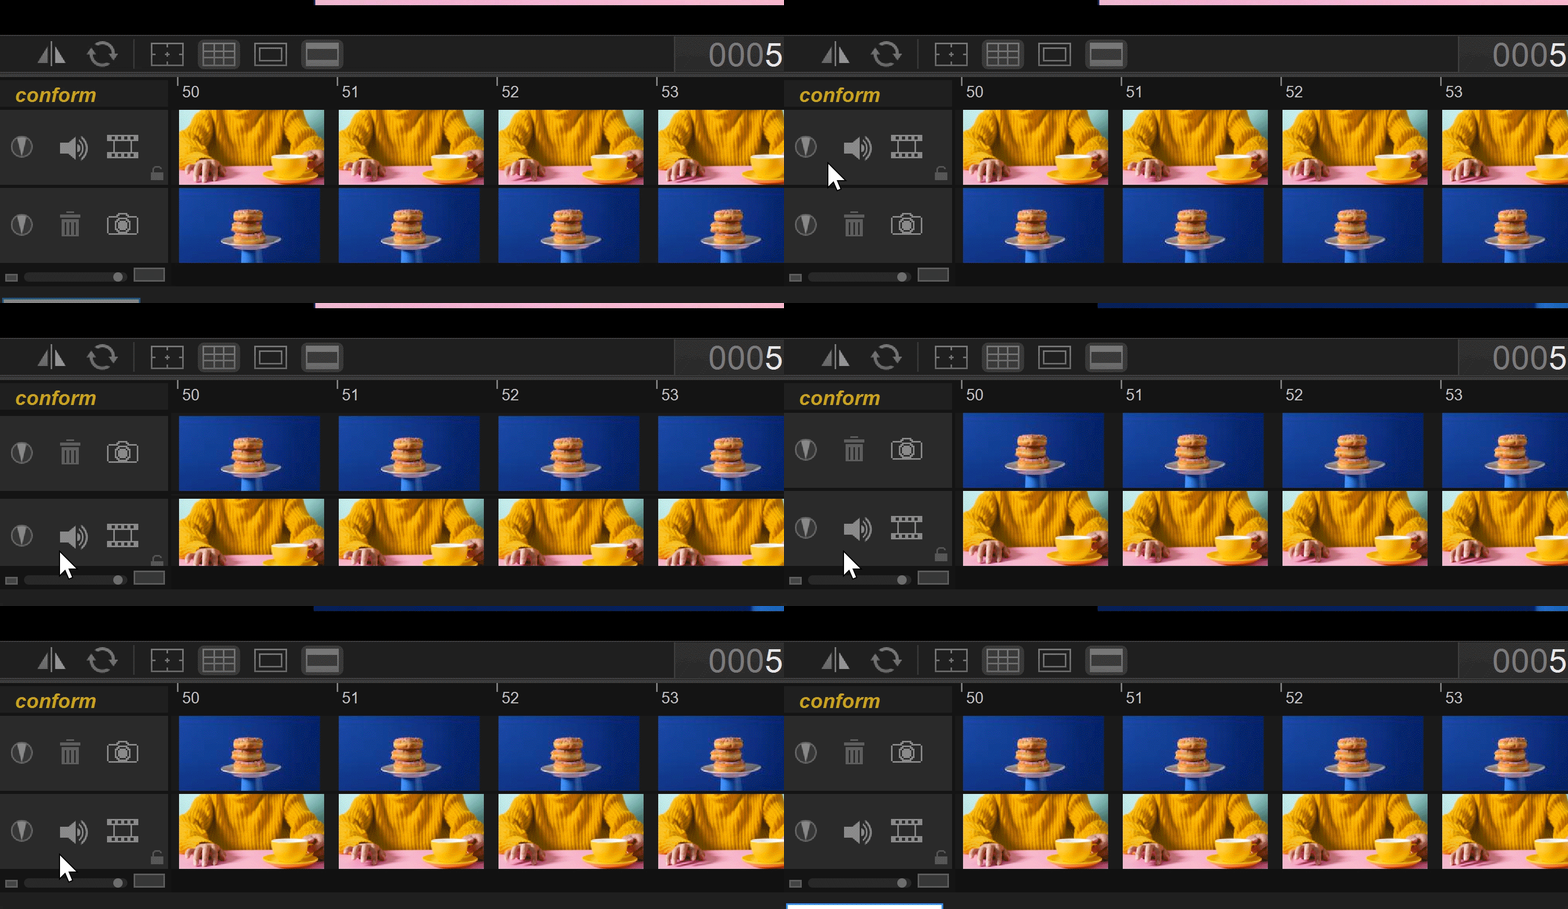
3. Drag your reference timeline (the background) down so it's below the animation timeline (the one with live view).
4. Hover your mouse around the Live View screen until a floating window shows up. Click the film strip icon and look for the Chroma Key color picker.
5. Once you select the color picker, click on any part of the green screen. If you do everything correctly, you should see the background appear immediately.
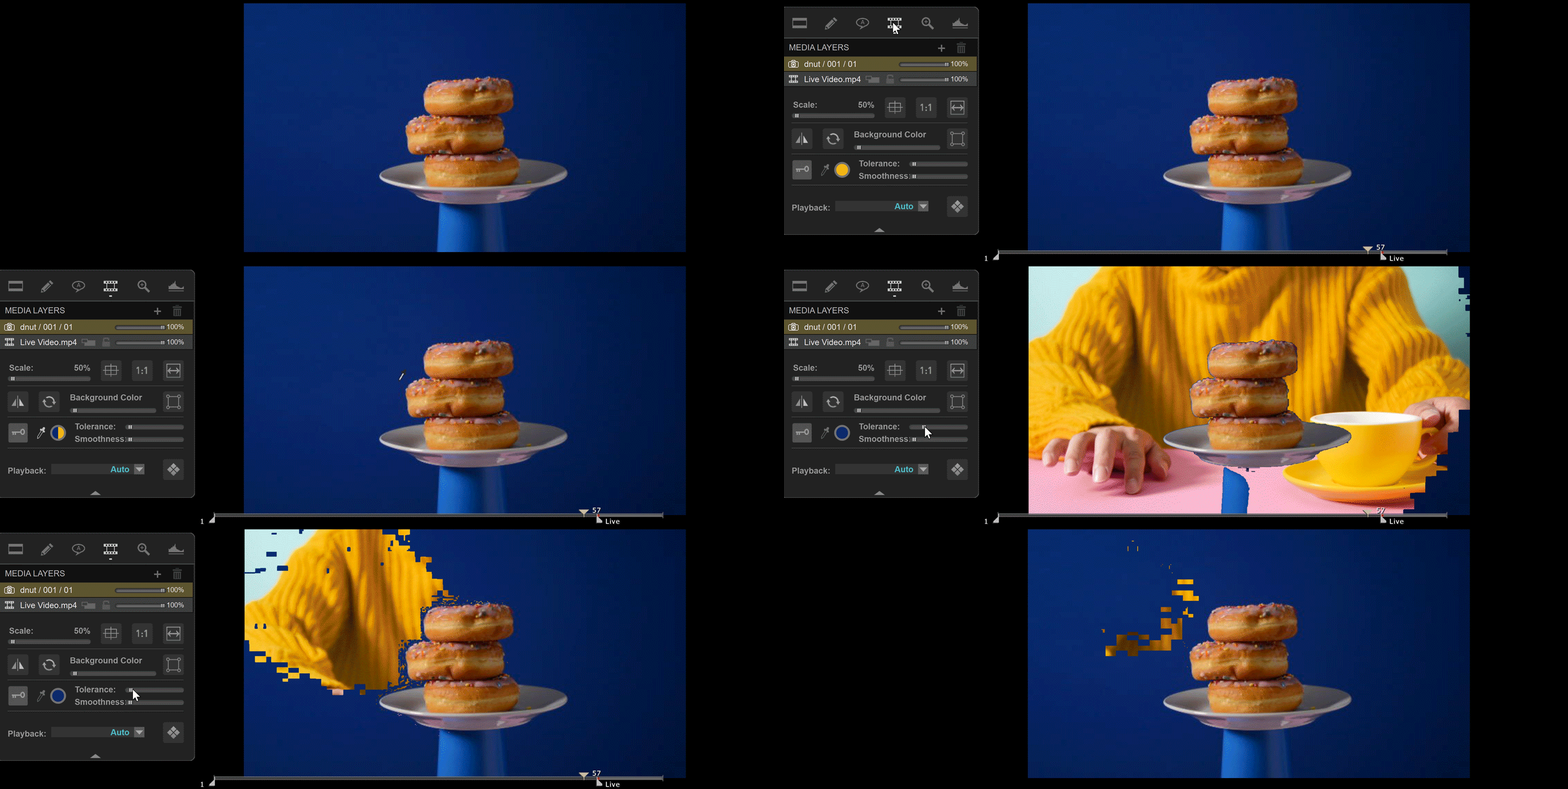
6. If your chroma key appears messy, adjust the Tolerance and Smoothness sliders.
Keep in mind that the green screen feature in Dragonframe is merely for preview purposes only. Your final exported images or video will still have the green screen intact. So the next step is to remove all that green in editing.
How do you edit out the green screen and replace it with a new background?
The magic truly begins in post-production. You can use the chroma key tool to automatically remove the green screen and replace it with any background you choose.
Many editing programs let you edit your green screen footage. If you have an Adobe Cloud account, you can use either Adobe Premiere or After Effects.
We'll use Adobe Premiere for this tutorial because it's easier to use for beginners than After Effects. But later on, we will also teach you how to remove the green screen with After Effects!
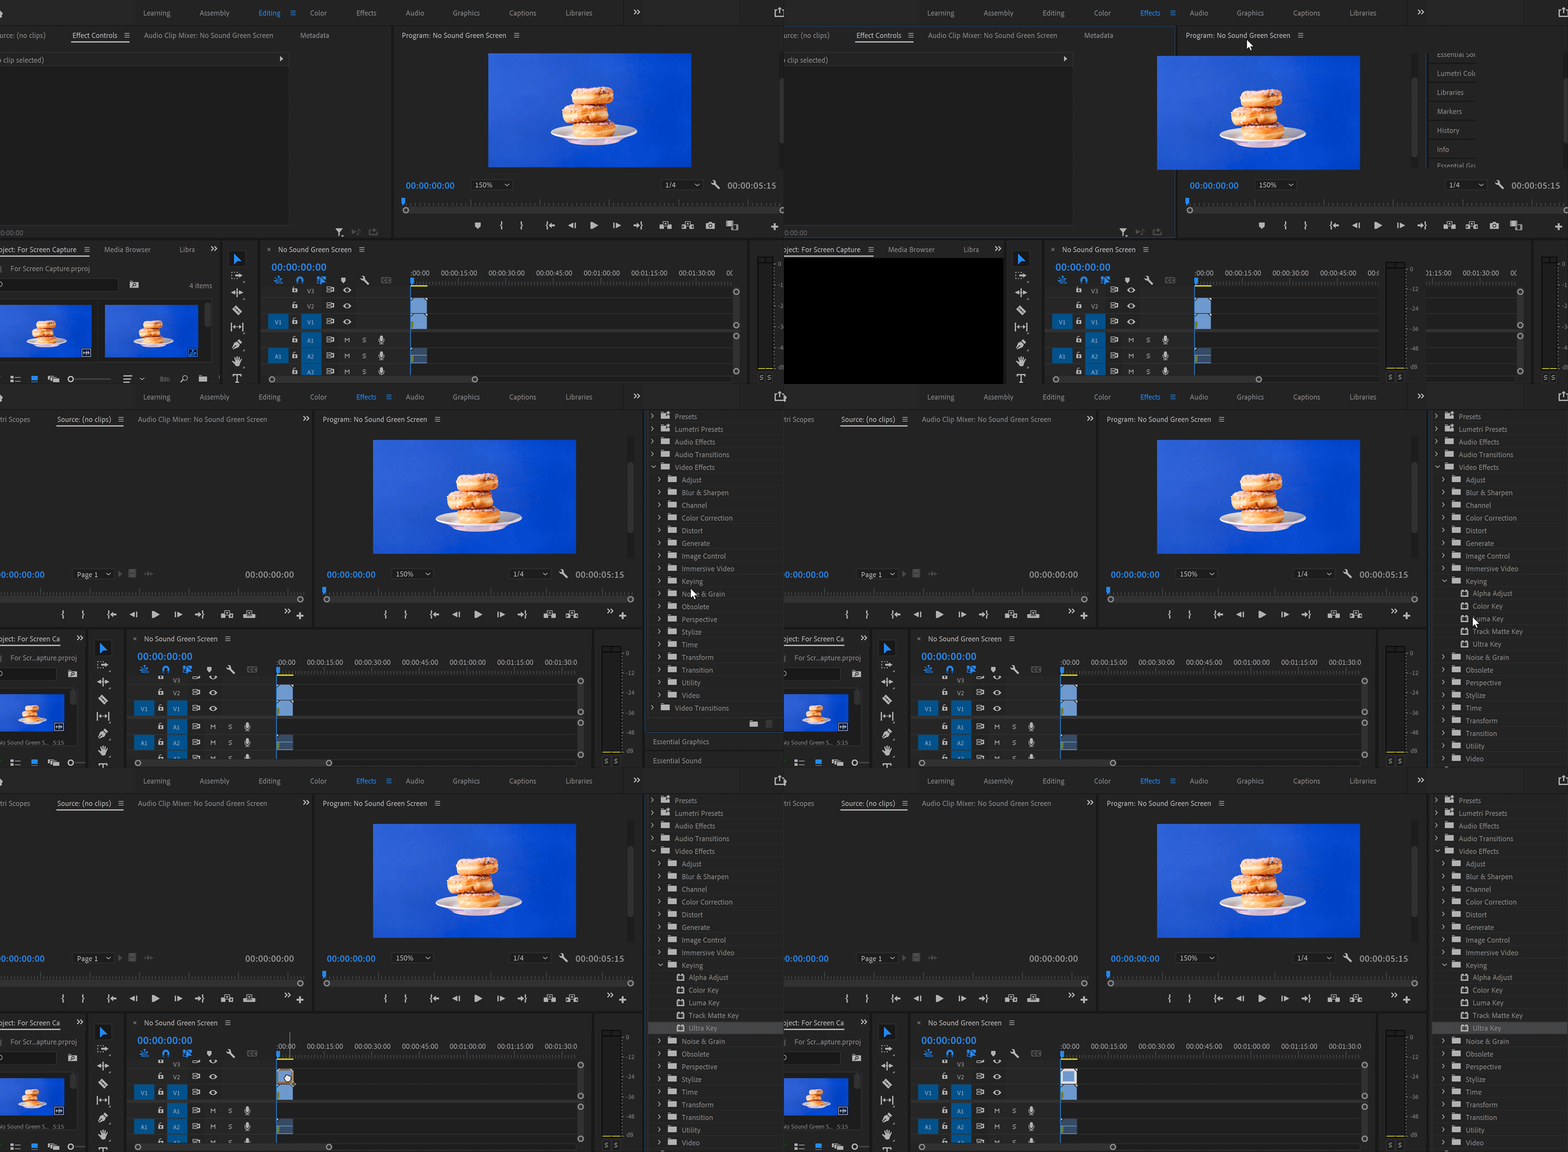
1. Drag your green screen footage to Premiere's Timeline in the V2 section.
2. Drag your background (live video or image) into the V1 section so that it's under the green screen footage.
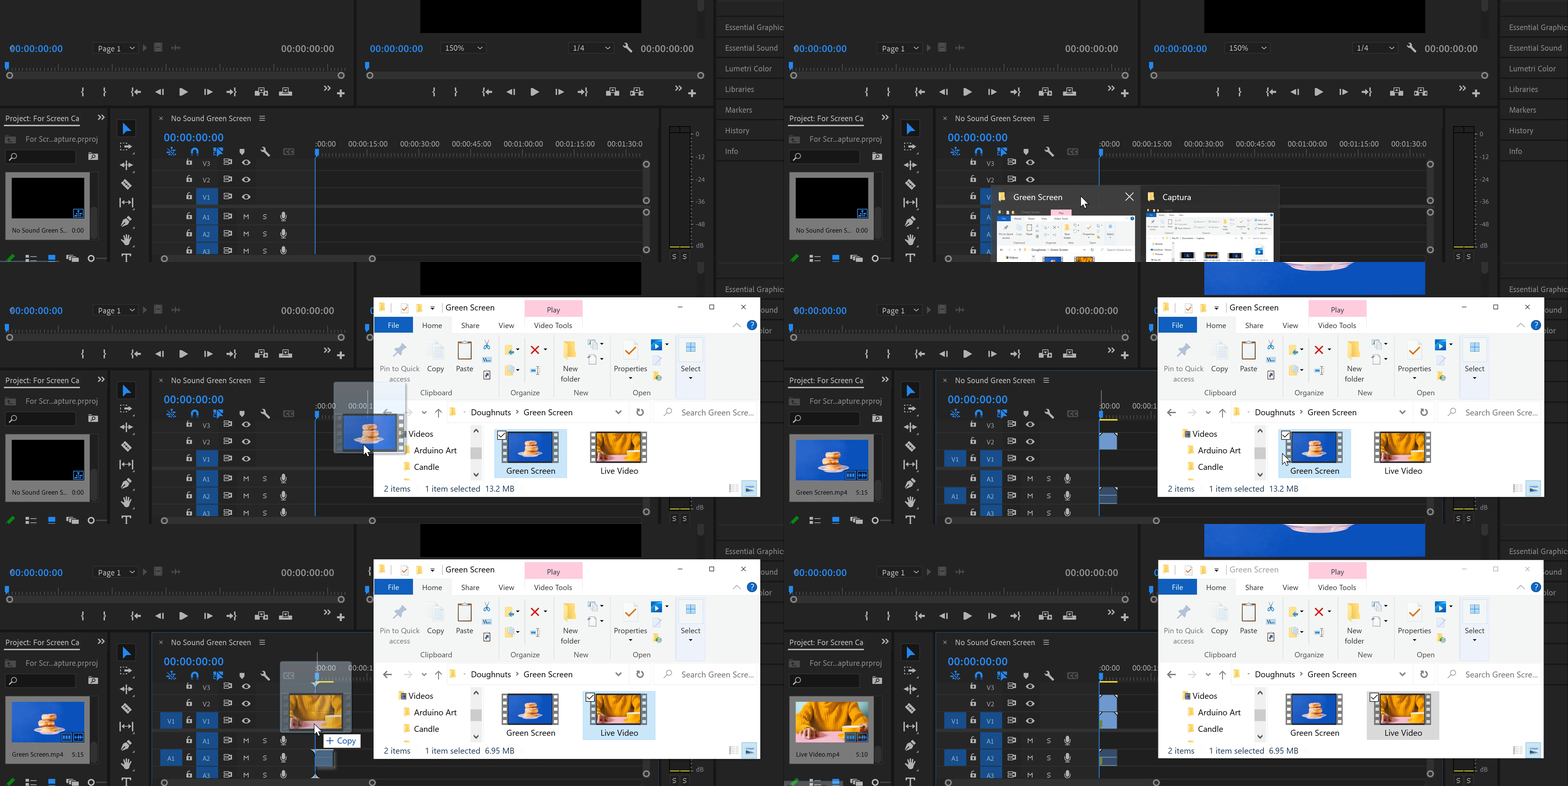
3. Click on the green screen footage to select it.
4. Go to Effects at the menu bar. Once the Effects sidebar appears, go to Video Effects > Keying > Ultra Key.
5. Drag the Ultra Key effect to your green screen clip to apply the effect. At this point, you shouldn't see any changes to your video ye.
6. Select the Editing tab in the menu bar. And once the editing sidebar appears on the left side of the screen, click Effect Controls and look for the Ultra Key effect.
7. Click the color picker and click the green screen. Instantly, you'll see the background appear! If you see some ghosting, experiment with the Output. In our case, setting our Output to Aggressive removed all the remnants of the blue screen. If it doesn't work for you, feel free to try the other options.
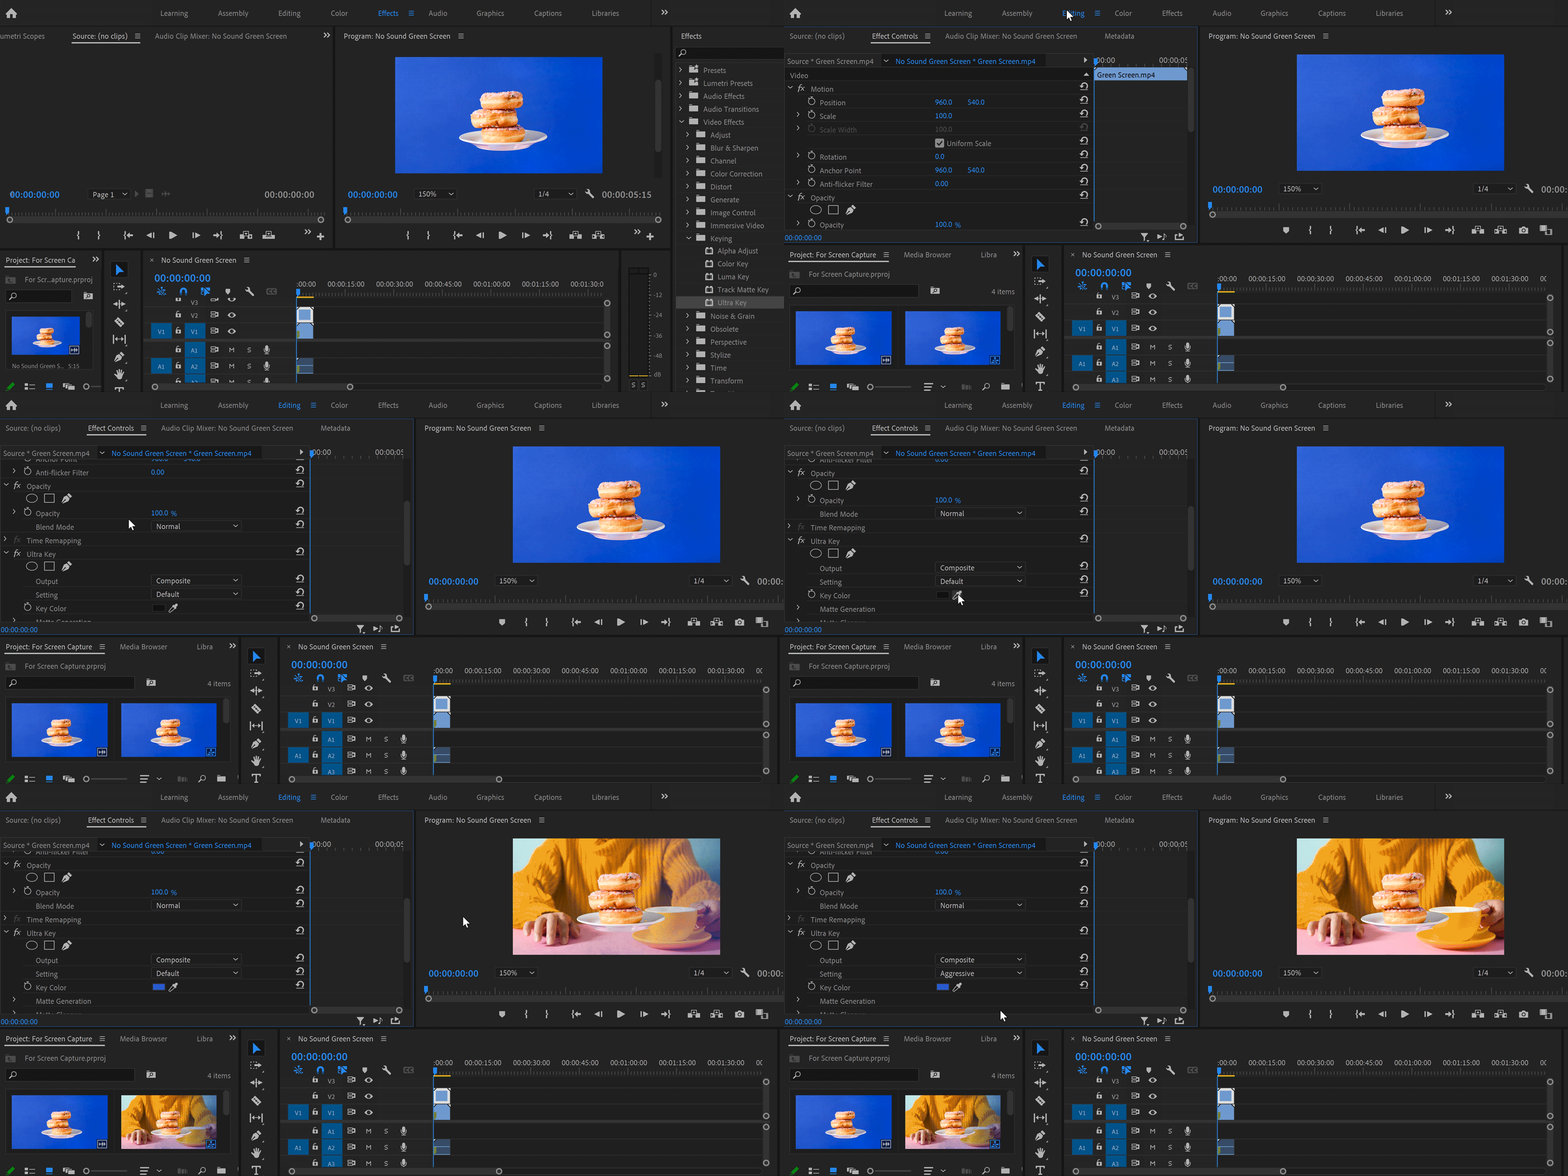
8. If you see blotches, feel free to adjust the parameters under Ultra Key in the Effects panel. We usually play around with Matte Generation and Matte Cleanup to get smooth results.
9. Double click on the video to activate the crop tool. Drag it to resize your green screen shot if necessary.

10. Once you're satisfied with the effect, you can start editing your files just like you would with regular videos!
If the idea of using a green screen somehow still intimidates you, just think of it as a filter you can apply in Adobe Premiere! It's just a drag and drop feature that removes the background automatically for you. So go ahead and try it! Who knows, it might just end up unlocking creative doors for you!